Square Enix has been working overtime to get Final Fantasy XV up and finished for the Xbox One and PS4. With the game now finally being available, gamers have been able to get in on the goods and play the massive JRPG that’s been in development for over a decade. For gamers looking for a bit of help getting through the game, there are some helpful walkthrough guides available for Final Fantasy XV.
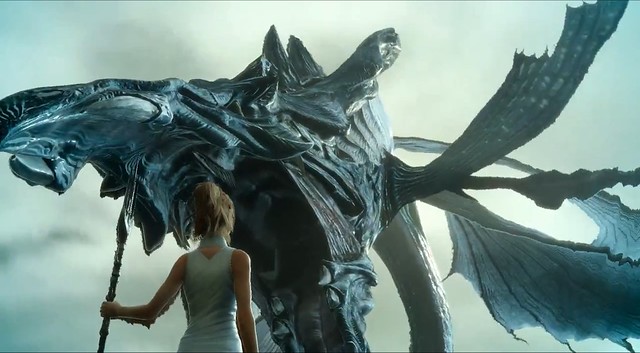
The game starts off with the option to allow players to either choose to play through the interactive tutorial mode that also introduces gamers to some story elements, or to hop right into the main game. If you skip the tutorial you’ll get a cinematic sequence that leads into the game where a giant sits stop a throne of fire, and Noct, Gladiolus, Ignis and Prompto battle the giant boss. The only thing players can do is walk toward the boss and look around, as highlight at the start of the walkthrough from YouTuber GamerrZombie.
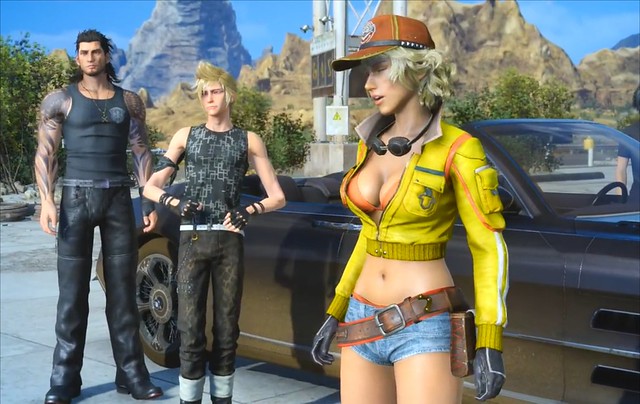
Chapter 1 – Departure sees Noctis and his fellow boy band members traveling toward Altissia so he can be wed to Lunafreya in Tenebrae.
You have to push the car through the opening until the title of Final Fantasy XV pops up. They’ll eventually get the car to the Hammerhead gas station where Cindy is. She’ll give you a map and you can also get some quests from Cindy where you can earn some gear.
You can get your first AP (Ability Points) that you can use across Exploration, Combat, Recovery, Teamwork, and Magic for Noctis, Ignis, Gladiolus and Prompto. You can assign the points by going into the Ascension AP menu after pressing start.
For combat, you can press the right bumper to lock onto targets and use specials with the left bumper.
You can press Triangle (or the ‘Y’ button on Xbox) to teleport to enemies with a warp strike when you’re at a distance. Press Square (or the ‘X’ button on the Xbox ) to dodge attacks. You can press the dodge/evade button right as an enemy is attacking to counter. Pressing the left bumper and a directional button will allow you to perform special attacks after the special meter gauge has been maxed out.
The mission quests will force you along with waypoint markers to follow. Simply continue to follow them as they teach you how to make camps and cook food.

You can only make camp or train at haven checkpoints, so check for them on the map – indicated with a camp icon – so you’ll know where you can go for respite.
By camping, the characters will receive upgrades and abilities at the end of the day. So rest often after completing various missions. The more expensive hotels you stay at the higher the bonus EXP you gain from resting.
Finish up the mission for Dave and Cindy will have the Regalia ready for you. You can return to the Hammerhead garage to purchase upgrades if you have enough money. Additionally, fast travel becomes enabled after you’ve visited any destination and parked there for the first time.
Cindy will give you another mission to deliver a package to an inn. There’s an additional side-quest to pick up before continuing the main quest line in Galdin Quay.
For some of the side-quests – such as the ones to hunt monsters – you may have to talk to NPCs to find out where the monsters are located. Most of the monster hunter quests can be picked up at the diners after talking to the chefs.
Head to the port only to find that there’s a hold-up in Altissia and the port is closed. There’s a fetch quest to grab some minerals up by the mines, nearly three quarters of a mile away.
There’s a fishing mini-game you can go on in an attempt to feed a kitten on the docks. You can cast the line with Square (or the ‘X’ button on Xbox). If casting isn’t going too well, you can recast using Circle (or the ‘B’ button on Xbox). The objective is to try to cast the line in the water where there’s a yellow dot or blue indicator on the mini-map. Follow the on-screen indicator and use the right trigger to reel in the line, but stop reeling once the tension meter starts blinking red.
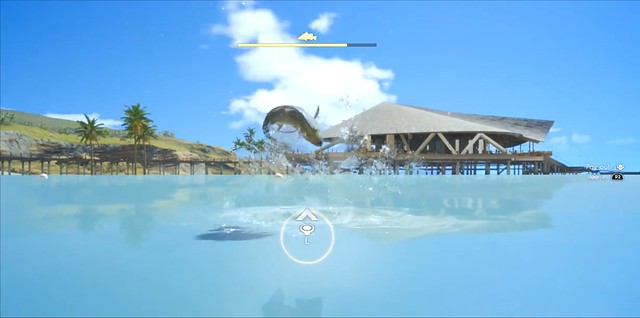
The object is to keep slowly reeling in the fish until the yellow meter is depleted. It takes a lot of time and a lot of effort and a whole lot of patience, so keep chipping away at it and avoid breaking your line.
Keep the fish and give it to the chef at the shop so she can cook it up and turn it into a meal for the kitten.
For the mineral deposit mission you’ll need to head up past the giant sleeping bird. You can sneak around the giant scary looking bird. Just stay still when the red bar appears and wait for it to go away before proceeding to get the garnet stone and return it to Dino.
You can complete another side-quest mining mission involving some goblins. Fire hurts goblins pretty badly, so don’t hesitate to equip fire magic before facing off against the goblins. You can head into the start menu for the magic creation and assign it to a digital pad.
If you talk to Dino and rest, the cinematic will play revealing that the King is dead and the fake boy band members decide head back to the city of Insomnia to investigate.
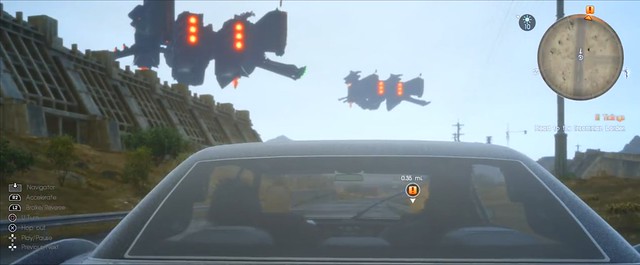
After defeating some of the humanoid robot soldiers, another cinematic will play leading into Chapter 2 – No Turning Back.
Talk to Cid to unlock the ability to mod your weapons.
You’ll then need to head to the hunter’s shack to talk to the Marshal. He’s just a few clicks away from the Hammerhead station.
Battle some birds and then talk to the Marshal. You’ll unlock the royal arms ability, which will allow Noct to deal out major damage at the cost of his own HP.
The Marshal, Cor, will accompany Noctis as he and his fellow boy band members examine the tombs and draw out the power.
Venture into and throughout the caves – simply follow the nav markers through the cave. Careful using heavy strikes in the cave or they’ll cause rocks to fall on your head.
At the 14: 40 mark in the video above he moves through the cavernous tombs toward the royal tomb. There are some some tough enemies to face off against.
Grab the power from the dead king and then Marshal Cor will call you to tell you to burn an Empire base. Monica has the quest details.
Head to the location and battle through the forces as the quest calls for. At the end you’ll need to fight Loqi in the MA-X Cuirass in a large scale boss fight. He’s level 22 and very sturdy. Using thunder and lightning attacks on the mech will do some decent damage. Hide behind the crates to avoid taking missile fire damage.
Defeating the boss will then cue Chapter 3 – The Open World.
You can visit the Chocobo farm and pick up a number of side-quests or proceed to the town and continue the main quest.
In the video below, the side-quests take priority first before the main quest is resumed, which is called “Burden of Expectation”.
One of the side-quests includes battling the behemoth, Deadeye. The first part of the quest is finding his den, the second part of the quest is sneaking through his lair and the last part includes actually battling him.
Head to Lestallum to meet Iris in the city. The quest is mostly just walking and talking, unlike the monster hunting side-quests.
The next main quest involves traveling to the tomb behind the waterfall. You’ll have to take the stairs down where the giant crab creatures are and then move behind the waterfall.
When you get into the cave you’ll have to fight some slime monsters and slide down some caves like Super Mario 64. Be sure to bring plenty of health potions because the monsters inside are no walk in the park (unless you trained and grinded out some levels).
Once you head into the tomb you’ll unlock a cool looking glaive that will be added to your arsenal called the Armiger. You can activate it by pressing the left and right bumper together.
Players eventually meet up with Ardyn, where they go to the car park to pick up his vehicle. You can follow behind him and earn the Beast Whistle that can be used with the right trigger and the directional pad. They venture to the disc, in which the quest is nothing more than an excuse to tailgate.
Drive in and follow the pathway toward the nav marker through the ruins.
The royal tomb is right at the end of the pathway, featuring the Blade of the Mystic.
A cinematic will play leading toward an encounter with the Archaean. Avoid stepping on the fiery hot spots.
After defeating the Imperial troops and heading up the path, the Titan will keep pounding you on the pathway. Use the roll/dodge to dodge his punches.
You’ll need to fight the Titan’s hand until the Imperial soldiers arrive. Continue hacking and slashing away until the Armiger combo becomes available
Keep dealing damage until the cut-scene plays.
This will lead into Chapter 5 – Dark Clouds.
The boy band will be without their fancy Rolls Royce-wannabe for a while and they have to do things on foot.
You’ll need to find the three runestones of Ramuh. They’re scattered about Duscae. Follow the nav markers to each stone leading up to Ramuh.
You can use Chocobos to travel around while the Regalia is unavailable. You can use the whistle to call a Chocobo to help you out and get you to the quest marker.
From there you’ll need to infiltrate the Imperial base to retrieve the Regalia. You can sneak through some parts of the base and even use a turret to blow up the magitek tanks.
YouTuber Linkmstr covers the infiltration of the base in his complete chapter playthrough of Final Fantasy XV.
You’ll need to take out the generator to weaken the magitek forces. You will eventually encounter Ravus but you won’t have to fight him.
The boy band will meet up with Iris in Lestallum and travel some more to Cape Caem where they attempt to avenge the death of Jared. It’s another stealth mission where you’ll need to track Caligo.
You’ll need to move around the tank on the left side of the base and stealthily take out the guards.
Eventually after the stealth segment ends you’ll need to take out the magitek mechs and Imperial forces.
During the fight, players will have to battle the mercenary Aranea. Don’t forget to use the warp points on the vertical structures to rest and restore your HP and MP. Aranea moves and strikes a lot so dodge and then start your combo attacks using a warp strike.
Following the encounter with Aranea, you’ll need to head back to Cape Caem. Gladiolus will take leave for a while and it’ll just be the three skinny boys of the boy band left.
This leads into Chapter 7 – Party of Three. The chapter centers around acquiring mythril so they can restore the old ship that Regis used to have.
You’ll have to make do without Gladiolus, which can make some of the fights against the mobs difficult if you didn’t train. So find a good training area or complete some side-quests so you’ll be strong enough to make it through the main quest line without Gladiolus during that particular chapter.
Move through the ruins after meeting up with Ardyn. He’ll lead you to Aranea, who will join your party during the boss fight against the Quetzalcoatl.
You can fish for some rare treats in the lake just outside the ruins if you want to try your hand at getting some good stuff. Alternatively, you can simply leave with Aranea, who will bring you back to Lestallum where Chapter 8 – Seaworthy commences.
Noct and the other two boy band members head to the power plant in order to stabilize the generators. You’ll need to fight the daemons inside but the other two boy band members have to wait outside. You’ll be joined by another hunter who will have your back, though… who is Gladiolus.
Gladiolus will send you on a side-quest to geat some angus meat from a behemoth for the ultimate cup of noodles. Completing this quest will add the cup of noodles recipe to Ignis’ cookbook.
The rest of the chapter consists of small nick-knacks to deal with, and once you’re done running around on Chocobos and buying items and upgrading your gear, you can talk to Cid to finally proceed to the end of the chapter.
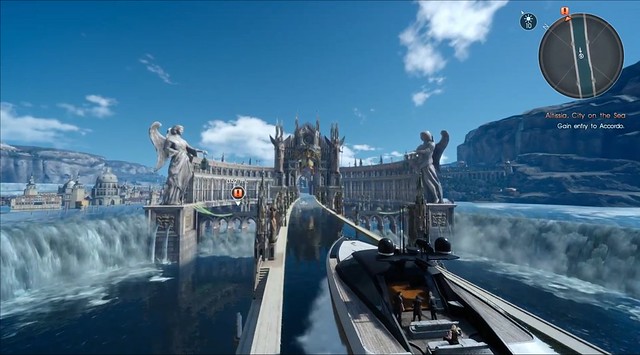
Chapter 9 – Callings finally takes the boys to Altissia, even though that was supposed to be the original mission at the very beginning of the game. The first 10 minutes of chapter is basically one long cinematic.
After looking at the wedding dress on display, you’ll need to negotiate with Camelia using diplomatic talking points to win over Camelia’s favor.
You’ll need to be truthful with Camelia and show concern for her city.
In order to earn the rite you’ll need to help Camelia protect the citizens and agree to her terms.
A large majority of the chapter is cinematic in nature, and fairly linear. You have to partake in various quick-time events involving Leviathan leading up to a boss fight with the monster. It’s similar to the water boss from Sonic Adventure.
There’s another lengthy cut-scene and then Noctis has a Dragon Ball Z battle with Leviathan.
After another lengthy cut-scene the game will take Noctis and the rest of the boy band to Grolea for Chapter 10 – The Heart of the a King.
There’s another lengthy cut-scene and then Noct can roam the train until it reaches the destination. You can stock up on supplies and then head into the mines, but Ignis will be blind… you’ll have the choice of taking him with you or leaving him behind.
You’ll need to defeat Malboro in the deep of the quarry. Also, before the boss fight Gladio will ask Noct if he’s finally accepted his responsibilities as a king and players will have a choice of being a punk-arse beyotch or a righteous king in the making.
After defeating the boss you can then proceed to enter the tomb and gain access to the new power.
Chapter 12 – End of Days is mostly story focused, with some linear combat sequences in between. It explains more of Luna’s responsibility, as well as Noctis’ true role in the realm of Lucis and his responsibility to deal with the rising scourge of daemons. The majority of the chapter takes place throughout the train.
Chapter 13 – Redemption sees Noctis finally getting a better understanding of Luna’s responsibility, as well as Ravus’ role her being an Oracle. The game takes on a more linear role similar to the likes of Final Fantasy XIII. You won’t get to use weapons here, so dodge and run past enemies as often as possible and use the ring when allowed in order to get through some of the segments.
After losing his powers, Noctis is able to finally get his powers restored after venturing into the heart of the empire due to goading from Ardyn.
The mission structure here is very linear, and hopefully you did most of your training leading up to the final seven or so chapters because the story gets a lot more intense, focused and linear. So it’s important to have grown as strong as you feel comfortable with before the restrictions get set into place. The main boss will be a demonized version of Ravus. After defeating him, however, there is a horde of daemons who pop out, so you can either hang around up high to avoid the daemon onslaught until you have the go-ahead to move forward, or you can battle it out with the boy band.
Chapter 14 – Homecoming takes place 10 years after Noctis’ banishment. He returns to his homeland only to find it’s been basked in the darkness of daemons and Ardyn in control. It’s fairly linear from here onward as cinematics are interspersed with preset nav points. The only thing you have to do is ensure that you’ve trained long and hard to prepare for the final showdown.
Noctis will meet up with his boy band members once more, and they’ll make a plan to charge in and take back the citadel. Players will need to battle through the enemy forces and remaining Imperial troops before facing off against the boss that opened up the game.
The final boss fight takes place against Ardyn, where Noctis and Ardyn will fight one-on-one.
During the final fight with Ardyn, Noctis will have to fight without using team tactics. So make sure you’ve mastered performing the combos, warp and the warp transition into a combo because you’ll need it a lot.