Crytek’s new VR adventure game for the PlayStation VR called Robinson The Journey is another one of those games that blur the line between narrative storytelling and first-person puzzle-solving. Players looking for a walkthrough guide or help to get through the title can find one right here.
The game starts by explaining that Robin has escaped from a catastrophic disaster on a space station above an alien planet. Robin lands and attempts to survive with the help of HIGS, the flying robot. Robin is accompanied by a newly hatched T-Rex baby.
YouTuber Shirrako offers up a short playlist of the puzzle adventure game to offer you a guided, video tour through Robinson The Journey. You can check it out below.
The very first task is to remove the debris from the small watermill. Simply use the triggers to grab the objects blocking the mills and throw them away.
The next puzzle is based on distributing energy through the proper outlets. You’ll need to activate the first two lines to power them up and then send a charge through the red node and then to the main tree to restore the power. This puzzle is featured at the 10-minute mark in the video above.
The next task is to repair the dinosaur scarecrow. There are some cylindrical canisters on the ground. Simply pick them up with the device and place them on the arms and head of the scarecrow. You may have to rotate the objects to get get them to fit properly. The hat is located on top of the device near the cliff.
Head toward the blue energy dome and you’ll find Laika behind a canister. Remove the canister and Laika will come out. You can play a game of hiding and seek with Laika, who will discover a destroyed HIGS unit. You will need to scan the HIGS unit using the R2 trigger to tag all the green nodes on the unit.
You will need to find three more HIGS units. Use Laika to scare off some of the other dinosaurs by the security gate by using the D-Pad to direct Laika to a location – using the up pad – and then have Laika scare off the other dinosaurs using the left D-Pad.
You can venture outside of the safe zone by heading through the pathway leading toward the Farm. Follow the pathway through the mountain pass toward the farm.
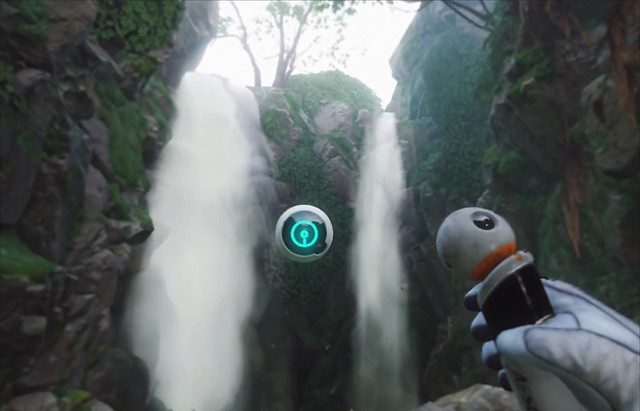
Head up the ladder and climb up the notches on the rock face using ‘X’.
You’ll need to repair the makeshift wind turbine by placing the panels back onto the axis. You’ll need to find four panels and place them back onto the small turbine. They’re scattered around the area near the turbine.
Head back down and one of the terrasaurs will take a crew HIGS unit back up to their nests, so you’ll need to move a panel out of the way and climb up on the hardened moss to get up to the nest.
Break apart the terrasaurs nest by pulling the pieces out from the nest, which will cause the terrasaur to drop the HIGS unit into a nest below. Place a scarecrow by the nest to scare the terrasaurs off from their nest.
You can scan for some objects and head through the cave to progress to the next area. There’s a sign that has an arrow with a skull on it just outside the cave that leads toward two other routes, including the tar pit to the left and the jungle area to the right.
Follow Laika through the cave toward the area where the long-necks are. You’ll need to move up onto the platforms to get across the tar pits.
You can move some of the debris out of the way to create a pathway with a tree log. Use the space debris scattered around the tar pit to create bridges across the pit. You can scan some of the dinosaurs within the pit area, and continue to make your way across the pit by picking up debris and creating makeshift bridges.
When you get to the part where you’re in between the long-necks, have Laika roar at the long-neck so that he moves over just enough to allow you to get past the long-neck. Have Laika roar some more at the long-necks to get the long-neck to move so you can have HIGS solve the puzzle.
Help Laika get across the pit and then climb up the rock face. Head to the area where the supplies are scattered about on the rock. HIGS will suggest for you feed the long-neck and offer some of the orange supplies to the dinosaur. Once you solve the puzzle give the orange fruit can to the long-neck.
Proceed to scan the HIGS unit to discover how the Esmeralda ended up crashing on Tyson-3, and then have Laika roar at the long-neck to get it to move out of the way so you can skedaddle back across the tar pit.

As you make your way back across the pit, you’ll encounter a baby long-neck trapped in the tar. Use the debris to place it in front of its feet to help it climb up out of the tar. Head back through the jungle and take the path that says “jungle” on the signpost. Head through the area and across the bridge where the raptors are to find the missing HIGS unit.
Another long neck will block the way, but you can get it to move by throwing an object at the tree with the orange nests up in the trees. This will cause it to stop blocking your path so you can move to the next segment.
Proceed to climb across the chasm using the vines. You’ll need to shimmy across the jungle and platform your way toward the HIGS unit, which is wrapped up in one of the plants. Scan the plant and it will release the HIGS science unit. Once you scan the unit and get the data, you can then head back through the jungle toward the escape pod.
When you get back to the home base, the security fence on the opposite side will be destroyed. You’ll need to move through the jungle area and you’ll end up at a cable junction. Slide across until you get to the midway point. You’ll need to monkey-bar through the entanglement by grabbing onto the bars in between. Slide down, and then begin to climb up the cliff-face.
The clam-like creatures will open and close on a timed interval so you’ll have to time your grabs when they open up. You’ll need to move very quickly otherwise the clam creatures will open and you’ll fall into the sinkhole.
Continue to make your way through the jungle and meet up with Laika past the long-neck bones. Pull down some debris from the trees and climb up to uncover a communicator. Scan it to get the data.
You’ll also find the Emergency Team HIGS inside the mouth of the skeleton. Scan the HIGS unit and you’ll discover that a mutiny took place on the Esmeralda, leading to the crash of the space station.
After scanning the HIGS unit, Laika will have run off into the cave. Follow her into the cave and just outside where the raptors are. Stealth past the raptor by throwing objects to distract it, and then head down the cleft and proceed down the wreckage.
Once you get down climbing you’ll need to pry the wreckage free down by Esmeralda’s main capsule and use the cables to climb over to it and then climb down the capsule and slide down inside. Laika leads you to the power station to repair the corrupted HIGS data. Flip the red switch, place the battery into the slot and then lean in close to have the system scan your face.
After placing the batteries in the tubes you’ll need to climb around the facility through the hatch to get to the final terminal. The battery will be lodged in the debris.
You’ll then need to take control of HIGS and connect the power nodes to activate the holograph tape. Climb back around the outside of the hatch and head around the facility and head into the room with the button that allows you to decrypt the data. You’ll then get a look at the holographic presentation.
In the final sequence with the T-Rex, you’ll simply need to follow HIGS’ instructions and head to the device, and disable the gravity on the projector to cause it to fall onto the T-Rex.
