Invader Studios and Destructive Creations’ Daymare 1998 has been one of the msot highly anticipated survival-horror games to come out this year, and now that it’s currently available for gamers, plenty of people are taking the opportunity to experience the horror and thrills firsthand. For gamers who picked up a digital copy and need a little help with figuring out where to go and how to solve some of the puzzles, there’s a Daymare 1998 gameplay walkthrough available for you.
YouTuber MKIceandFire has a full playlist for the game, starting from the beginning and working their way all the way up to the end. It’s not terribly long, clocking in at around six hours or so. You can check out the walkthrough for Daymare 1998 below.
The game starts where the demo started. Only this time around there’s a cinematic introduction setting up the general gist of the game’s story.
We then are introduced to the H.A.D.E.S., team who are sent to exterminate the personnel and retrieve a sample of the toxin and extract with the goods.
Chapter 1: Signal Lost
Like in the demo, you’ll take control of Liev and get a briefing on how to use the real-time inventory management system, as well as how to activate the flashlight, aim your weapon, sprint, and interact with the environment.
Follow the pathway to the room with the injured security guard. After talking, kill the security guard and proceed to find the caster gas.
You’ll also learn about slow reloading and fast reloading. If you fast-reload you’ll drop the currently equipped magazine to the ground, leaving any unused ammunition on the clip still inside the magazine. You can fast-reload by simply tapping the reload button once. Hold down the reload button to perform a slow reload button, which will carefully reload the weapon and place any unused ammo back inside your inventory.
Keep this in mind because if you fast-reload while in combat, you may need to go back to the position where you dropped the magazine and retrieve any unused ammunition you may have dropped.
Exit the security office and make your way upstairs.
Make your to the computer terminal with the admiral’s diary and then take the health vial on the counter.
Before you can access the computer terminal you’ll need to restore the power first.
Exit the lab and make your way across the walkways and up the steps. You’ll find some ammo in some of the lockers, along with some notes on the chair in order to restore the power.
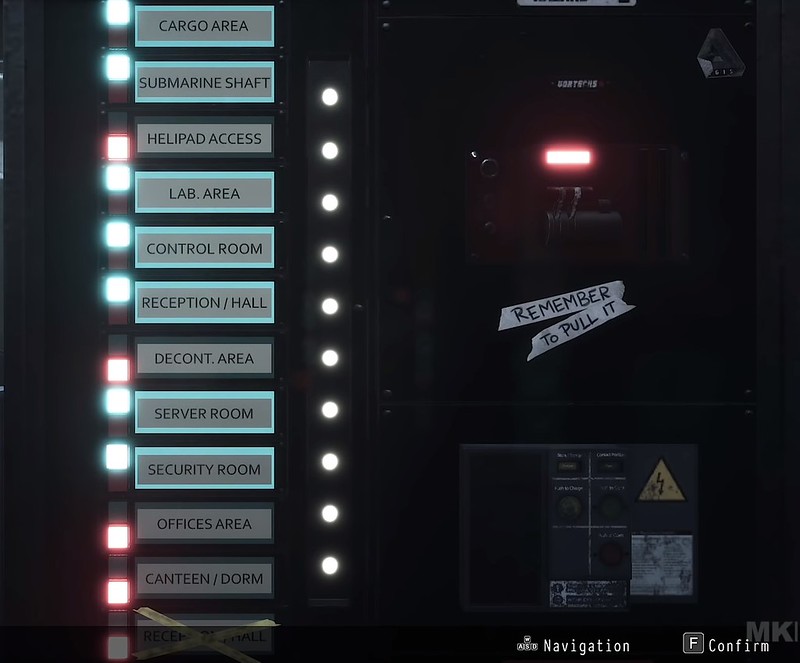
Flip the fuse switches in the order as they appear in the chart above and then navigate over to the power lever and pull it to turn the power back on. Head back to the lab with the computer terminal, kill the zombies and activate the terminal to start the recovery process to proceed to the next segment.
Make your way back to the cargo hold so you can operate the lift to raise the canisters for the helicopter.
Kill the zombies and activate the cargo hold crane to raise the canisters for the helicopter.
Make your way through the open cargo door next to the truck where the zombies are located and proceed through the double doors.
You’ll need to hack the door to access the next level, simply utilize the datapad on your wrist and select the difficulty of the hacking mini-game and then once that’s complete you can examine the console before going back down and heading through the green-highlighted door “Lab01”.
Inside you’ll find a researcher’s diary, a note for the supervisor, along with some extra ammo.
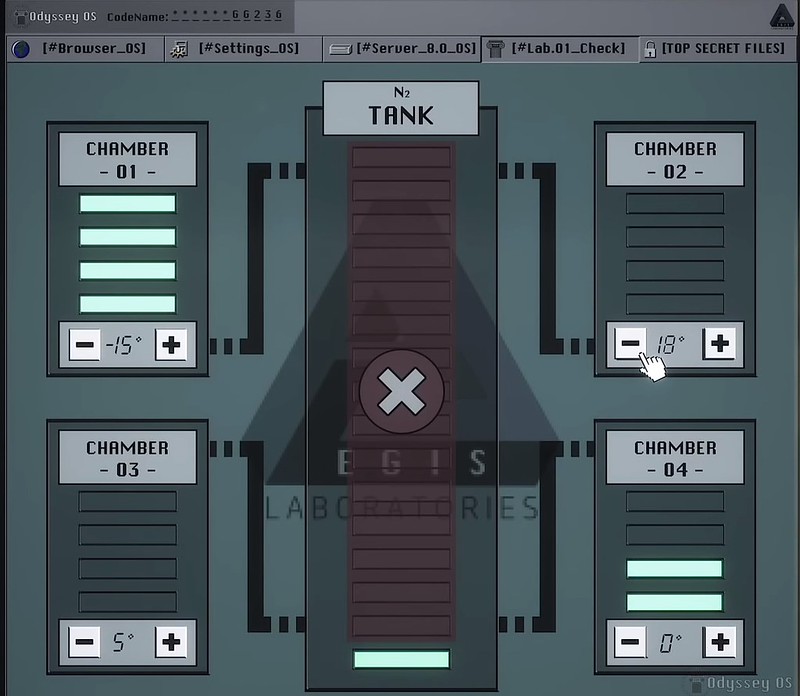
Head up the steps and activate the chamber’s cooling system through the terminal.
Modify the chamber cooling output so that it indicates the temperatures set in the image below.
Exit the room and fight the monster. It’s slow and stupid, so just shoot it in the head until it falls.
It will get back up so shoot it again until it falls… again.
You’ll receive a new objective to make your way to the top floor. Exit the lab through the green-highlighted door that was previously locked.
Make your way through the corridors until you reach the elevator. Agent Crane will send you a warning.
Once out of the elevator, proceed to deposit the sample into the machine in order to progress into the next area of the map.
Examine West’s body, hack the door to access the office, take the supplies and then exit the office.
Proceed through the hall toward the stairwell and make your way upstairs.
Go to the founder’s office and activate the desk to bring up the computer terminal. The password for the terminal is based on the paintings found around the upper floor.
The first answer to the security question “Cast a light unto the darkness and there shall be no storm from which he cannot save you” is pictured below.

The second answer to “No matter the injury, it will never end his journey.” is pictured below.

And the third answer to the security question “Long and perilous was the journey of the Argonauts to enter into its possession.” is pictured below.

Once you receive lift the security access, make your way downstairs and go into the security room and access the sample.
Proceed to the elevator and go to the server room.
A short cinematic will play with the scientist and Liev, where the latter kills the former. Exit the server room, head back down to the main entrance and go to the exit. You’ll need to defend your position by killing the zombies until Sandman arrives.

Chapter 2: Orders Are Orders
Another cinematic will play.
Liev will kill the crew and crash the helicopter with the canisters, causing the town to get infected.
You’ll have to make your way through the harbor toward the Blair Fish & Co., building.
You’ll have a limited amount of time to make your way to the building as the gas counter at the top of the screen counts down.
Race through the streets past the zombies and into the house with the open garage. Inside the houses you’ll be able to replenish your gas meter.
However, there are zombies inside the houses.
Kill the zombies and make your way through the kitchen and out the door. Head out of the yard and down the street toward the flaming zombie, and proceed left toward the burning bus. The house on the left will allow you to enter.
Kill the zombie and head upstairs.
You’ll find the note for the password for the lock in one of the bedrooms, it’s: 637.

Exit the house and out of the property through the garden in the backyard and you’ll find yourself back in the street. Proceed into the open garage and into the next house. Exit the house through the kitchen.
The alleyway will take you into the warehouse.
A short cinematic will play before switching over to Samuel, a black man.

Another cinematic will play and you’ll need to exit the watchtower by going downstairs.
Exit through the gate and down the pathway.
Sam will hallucinate – dodge the hallucinations and make your way to the jeep. Sam will lose his car keys. Go back up the path, grab the keys and get into the car to trigger yet another cinematic.
When the cinematic ends you’ll need to activate the generator at the back of the house.
Enter into the house and head upstairs.
After another cinematic you’ll have to go back inside the house, which will trigger another a cinematic.
Head to the back of the house and then run into the barn when Sam encounters the first zombie.
After another short cinematic Sam will finally take hold of a shotgun and you’ll have to run down the linear pathway toward the funicular.
You’ll need to activate the cable car before you can use it.
You’ll need to use the fuse box and press yes to activate the gate.
Then activate the breaker panel on the ground by pulling the levers from right to left.
Clear out the enemies in the area and then use the fuel pump system and turn the lights on to enable all three lights on the Vortech system. Pull the lever and the cable car will be activated.
When the cable car is activated another cinematic will play and Sandman will confront Liev. Not much of a fight takes place as Liev has his armed ripped off and then has his neck crunched in. Sandmann proceeds to eat the viscera out of what remains of Liev’s armpit.
When the cinematic ends the game switches back to Samuel, who takes the pistol and Liev’s data-band.
Head into the hospital and make your way through the halls. Kill the zombie patients and head down the open doors that lead into the maternity ward.
Follow the dead bodies into the lab.
Make your way out of the other side of the lab and there is some ammo on the ground. In the next room it will take you into the quarantine zone.
Walk forward toward the machine to trigger yet another cinematic.
You will receive the cable to hack the override along with a health vial.
Exit the quarantine area from whence you came and use the hacking cable to get into the room. There’s another health vial inside.
Go back into the quarantine area and you can examine the other rooms and halls; you’ll find some extra ammo in the lockers in the room on the right, while you’ll need to progress further into the hospital by going to your left.
When you get done examining stuff and gathering supplies, exit the hall, go back into the quarantine zone area and then proceed through the door at the end of the hall.
In order to get into the outdoor garden you’ll need to access a tool. Head to room 10.
Dr. Atherton will contact Sam with instructions on how to access a hidden door in the room.
The device will begin to beep when you get close to a secret door. It’s in the far left corner of the room.
Once inside the room you’ll need to retrieve the chip and from here you can access the H.I.V.E. Terminal storage unit.
You can also trade items here to acquire supplies for weapons or to restore your health.

Interact with the terminal storage and send the data ID to Dr. Atherton.
When you get done micromanaging your inventory, exit room 10, make your way back down the halls to the quarantine protocol hub and interact with the ICU terminal.
Dr. Atherton will give Sam a key to the lower levels. Take the key and head through the door to the left inside the quarantine hub and there’s an elevator at the end of the hall. Go inside and take the elevator to the parking area. There are some supplies in the garage area you can take.
Whe nyou come out of the elevator there’s a green door at the back of the garage you’ll need to enter. It will take you into the generator room.
Make your way through the service tunnels outside of the generator room and there’s an indented part of the hallway. Go close to the wall and your device will beep; a door will open .

Inside the room, activate the terminal and input the Hexacore sequence and then proceed back down the service tunnels.
When you finally exit the service tunnels you’ll have to fight a boss… the Melted Man.
The Melted Man has the ability to fire projectiles at you, so don’t stand in the same place for too long.
Take out any of the zombies nearby before you focus on the boss.
Use the shotgun and aim for the head to take him down quickly.
When the boss is finally defeated, go to the elevator and go interact with the ICU terminal in the quarantine zone.
The Doc will give Sam yet another mission to complete. Rescuing a Doctor trapped in the east-wing of the hospital.