Pencil Test Studios’ Armikrog has overcome crowd-funding, surpassed Steam Greenlight and has finally become available to backers and every other gamer alike via digital distribution. Given that this is an old-school puzzle game not everyone will be able to get past the puzzles with ease and that’s why there’s a complete gameplay walkthrough guide available for some of the more difficult segments.
YouTuber Rangris Gaming has a walkthrough from start to finish to help with each of the puzzles and mind-twisting logic segments in the game, and you can check out the four-video playlist below.
For the first door at the start of the game, just grab the lever on the ground and put the lever in the handle on the right side of the screen. Once the lever is pulled the door on the left hand side of the screen will open.
For the second room you enter, push the monster through the door into the third room. The lights will go out. Have Beak-Beak travel through the hole in the wall and pick up the lever in the cave. It should be highlighted with an on-screen puddle effect. Bring the lever back to Tommynaut and have him use the lever to open the door to the first room. Then head back to the third room and push the monster into the doorway linking the first and second room together and then press the lever on the left hand side of the screen. It will force open a trap door with a vine that you can use to climb up.
After the vine comes down, travel to the very top of the structure – you’ll need to go to the forth floor. Hop off the vine and grab the lever in the room to your right. Travel back down the vine and place the lever inside the hole that looks like a PlayStation’s Square button. Keep turning the crank until the door comes into view.
Go into the room and have Beak-Beak travel through the small hole until he comes out on the other side of the tunnel. Click on the vine monster to get a short cinematic that explains the Armikrog history. The vine monster will throw Beak-Beak an item that you can carry back to Tommynaut for him to place in the machine. Have Beak-Beak press the big red button at the bottom of the doorway on the right hand side to activate the machine.
Proceed to exit the room and crank the shaft again until the second room is revealed. Yes there are “two rooms in the round”. The second room is after you come across a little icon that causes the light to come on above the doorway. Cranking it a few more times will reveal the second green room.
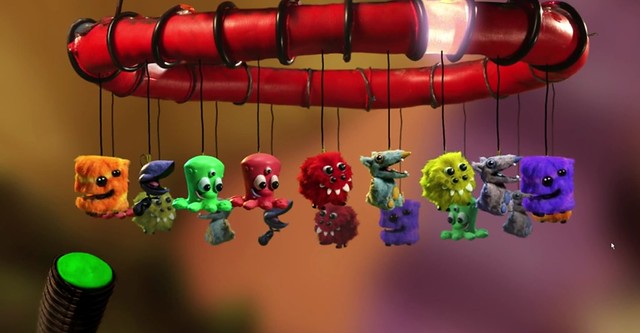
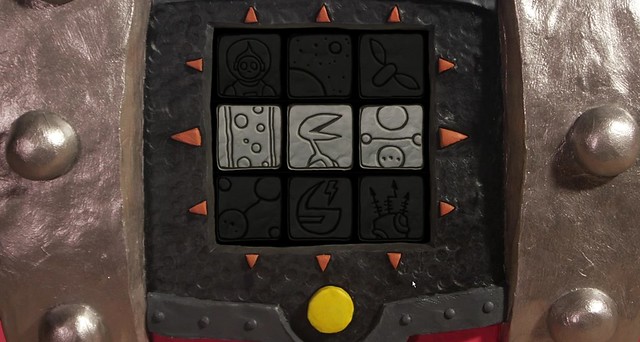
You’ll pick up a baby in the room and once you come out it will begin to cry. Click the icon to do a small puzzle involving a musical crib. You’ll need to align the monsters as it’s pictured below to get the baby to stop crying.
For the puzzle on the second floor in the purple room that requires you to align the icons, it can be tricky but first you need to ride in the vehicle on the top floor and travel down in the vehicle to unlock a set of blue icons. It’s a dead end but once you reach the end simply travel back to the top and head to the purple room on the second floor. You need to have each of the rows setup in a specific manner after you unlocked or accessed each of the blue icons in the first room, top room and at the end of the buggy ride to open the door and complete the puzzle in the purple room.
In the room with the giant rotating treadmill, you simply have to put the icons in the tab at the bottom according to the chiseled out blocks in the treadmill room. This will realign the tracks for the green buggy located at the top of the building. For the treadmill puzzle: You’ll need to have a straight line, the three lines, the three lines and then another straight line.
Get on the vine and head to the top of the structure. Place the lever in the device and the suction will put you in the green vehicle. You’ll need to complete another puzzle to open the door after you get to the end you’ll need to complete another puzzle to open the door. Just get the block icons aligned in the bottom shaft as pictured in the image below.

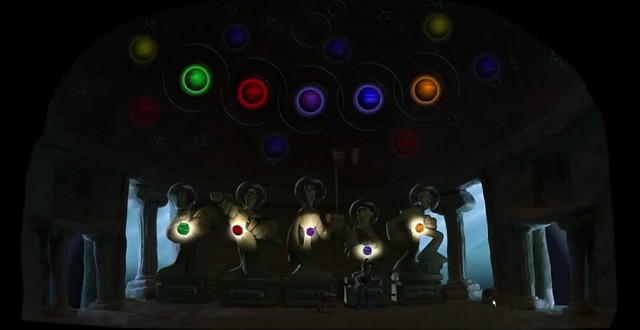
After you move through the rooms and turn off the lights in the last room to the far right, move back into the room with the statues and there will be a puzzle where you’ll need to align the planets to get a specific color set. It should be green, red, purple, blue and orange. You can see how the puzzle should look in the image below to complete it successfully.
After you complete the puzzle the door in the room to the far right will open and you can push the orange, square monster over to the platform to grab a crank lever.
Use the lever to travel to the floor where there’s a giant gun. Put the lever into the housing and press it to pull the floor down.
Proceed to set the stats on the giant gun. The top one needs to be purple and set on the second notch. The middle one needs to be green and set on the third notch, and the third one needs to be yellow and set on the first notch. You can see how it looks below.
Press the button and have the cannon to shoot one of the flying creatures so it’ll drop a feather… which can be used as a quill.
Give the quill to Thomas Jeffersant, which is the ant in the room on the rotating treadmill.
Afterward you’ll need to complete yet another puzzle just outside the room on the blue wall. You’ll need to align the image as it was pictured in the room with the ant, in the following pattern in order to proceed.

After you press the button the rotating treadmill room will transform into a room with another yellow and orange monster in it.
First put Beak-Beak on the green button and push the small orange monster past the green ground barriers. Then push the tall orange monster in the farthest room to the left against the wall with the red button to lower the red barriers. Then bring Beak-Beak with you into the rooms and have him step on the big blue button and then proceed to push the small orange monster into the farthest room on the left with the tall orange monster. Then, move Beak-Beak all the way back to the first room with the blue wall puzzle and have him stand on the green button so you can push the small orange monster right up next to the tall orange monster. A lesson in tedium, I know. Grab the flying creature after you get up on the platform.
When you exit the series of rooms the baby will cry again and you’ll need to arrange the mobile to play a song and soothe it. The monsters must be aligned in the same pattern as above for it to drop the item you need to proceed.
Drop the flying creature into the dog bowl in the main room where the tentacle creature is. Have Beak-Beak eat the fly so that he grows wings. Fly him up to the ledge and then click on the tentacle creature.
Grab the two items – the first that the tentacle creature throws you and the second item, a lever, from within the cave. Place the first item into the machine in the purple room through the fuzzy doors and have Beak-Beak press the red button in the blue room to the left.
Travel down the bottom floor and go into the room on the right to place a fly in the dog bowl. Have Beak-Beak eat the fly to fly up into the caverns above. Fly through the maze to grab the lever sitting under the spotlight.
Head back down and use Tommynaut to take the lever and place it into the switch on the door to the left.
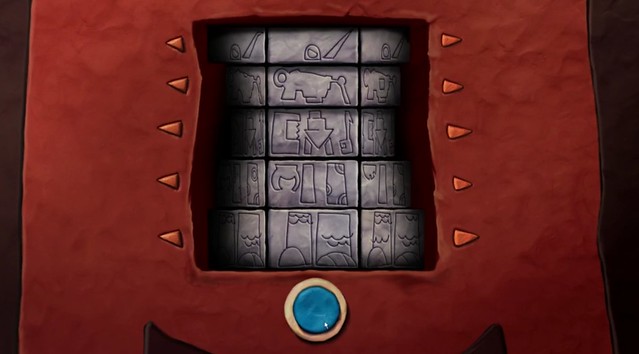
After going through the section with the little cart you’ll end up with a puzzle where you have to align a robot in order to shoot an egg from a lookout tower. Match up the robot icons with the image below to shoot the egg into the basket and lower the blocks so you’ll be able to get past that segment when it’s time to get into the buggy.
Next, put a fly in the bowl and use Beak-Beak to fly up through the hole and grab the items through the cave after talking to the tentacle. Place the item into the machine in the first room after you got off the transport cart. Move into the room with the ant and have Beak-Beak press the red button.
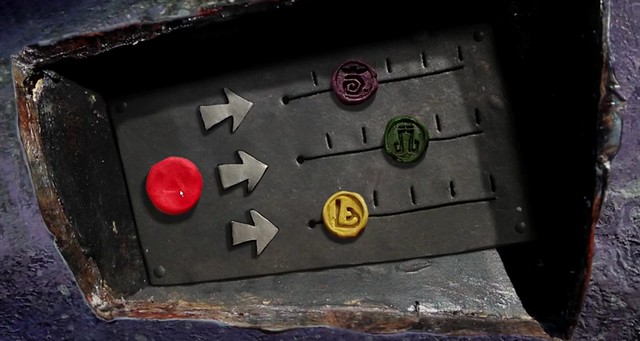
After P. gets stolen and you travel in the buggy to the next location, use Beak-Beak to get the item after talking with the tentacle and you also have to use Beak-Beak to complete a puzzle so you can get to the next location in the cart/buggy mobile. Align the three icons in the following order to open up the next segment.

After reaching the final part where you have to rescue P. from Vaugnaut, a battle will ensue and then you’ll be transported back to the room near the beginning where there’s a green panel on the left side of the screen.
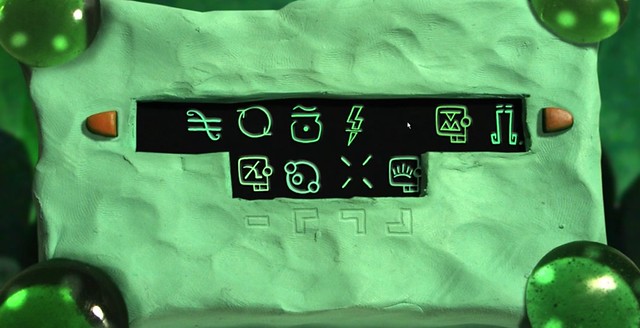
All the pieces you collected from P. will come into play here. After you active the console you’ll need to complete a puzzle by putting the right icons in the right place. As you’ll see in the image below, you’ll need them in the right order to proceed.
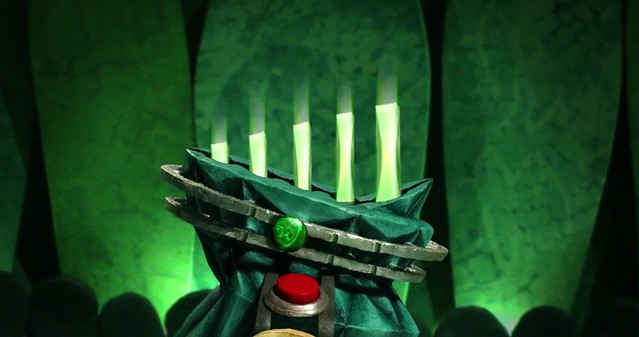
After completing the puzzle it will lower the shield around the device in the middle of the room. Next, you’ll need to align each of the five green crystals in the appropriate order. This puzzle can be tricky. So it involves putting the largest to the smallest from right to left, and the green knob needs to be on the second notch from the left, as pictured in the image below.
That’s it… mission complete. You just beat the game.
Armikrog is available right now for PC, Mac and Linux and will subsequently release on PS4 and Wii U. Need more info on the game? Feel free to visit the official website.