Naughty Dog’s final entry in the highly lauded Uncharted is now available for the PlayStation 4. The game has already received a lot of critical praise from critics, but that doesn’t always mean anything in the grand scheme of things. What it does mean is having access to a walkthrough guide to help get through some of the more difficult segments of Uncharted 4.
YouTuber Tetra Ninja did a complete gameplay walkthrough of the third-person actino-adventure title, starting from the beginning and running through to the end. You can check out the video playlist below.
The game starts with an over the top action sequence involving Nate and his brother Sam racing through a storm against some killer mercenaries. The only thing players have to do is ram the boats during the segment while racing toward the island.
After a short cinematic there’s a flashback to Nate and Sam as kids as players move through the tutorial, learning the ropes and how to platform effectively.
The platforming that takes place with Nathan as a kid is entirely linear. Just follow Sam through the parkour and grappling segments until the end of the level.

After the end of the orphanage segment it switches to the prison segment where players will spend a couple of minutes learning how to fight before watching a lengthy cinematic that leads to a platforming segment outside the prison. There’s a well near the point where you get the grappling hook back – down in the well you’ll find the first hidden treasure piece.
You’ll find the second piece of treasure after climbing up into the 300 year old prison. Once inside you can use the grappling hook to pull the planks off a window. In the debris from where you pull the board off the window, you’ll find a piece of treasure.
When you get into the prison “suite” with the zodiac puzzle, you’ll need to remove the stone with “XII” on it.
After going through the prison fight and prison escape – both of which are quite linear, you’ll end up in an underwater segment searching through some wreckage. If you head to your left through an archway you’ll find a hidden piece of treasure within some seaweeds.
After doing the other linear work you get to live through some nostalgia in Nate’s attack. The really cool part though in this segment….
SPOILER ALERT!
You get to play through the entire first level of Crash Bandicoot from the PlayStation One.
After going through the prison segment with Sam, just follow the linear path all the way to the exit. The next section involves breaking into the mansion to partake in the auction.
While traveling down the cliff-side, on the bottom left hand corner of the mountain you’ll find another treasure piece.
During the bridge segment where Nate and Sam have to grapple and rappel over to the mansion, you’ll need to first use Nate to swing to the far left side of the bridge to the side of the cliff where you need to swing over and grab on to the ledge, as depicted in the image below.

After sitting through some more cinematics, players will need to pickpocket a waiter to gain access to the kitchen area.
The pickpocket segment requires you to focus on the butt cheeks of the waiter and then wait until you can press Triangle – do not put the Triangle in the waiter’s cheeks! Instead, continue to focus on the waiter’s cheeks until you can quickly tap Triangle to steal the keycard.
Make your way through the basement area to the cellar and proceed to move the casks out of the way to open up the pathway through the cellar that leads up to the vent. Pull the cask in the corner over to the vent to make your way through the shafts.
After turning off the power and Sam gets the cross, the g ame finally introduces the new stealth mechanics as Drake has to avoid being spotted by the guards. The stealth mechanics are almost identical to that of Splinter Cell: Conviction or Mark of the Ninja. Just avoid alerting the guards by using all of the available areas around the map to star out of sight.
Make your way across the rooftops to the building where they are aiming their flashlights at and use the ledge to swing inside.
After Nadine Ross beats the manliness out of Nate and you make your way to the part where Nate gets shot at while hanging from the broken fixture, simply climb over it and begin to climb down to where the guards are that Nate killed. Continue to use the grass and stealth mechanics to avoid being spotted.

The next segment involves moving through the excavation area. You won’t be able to stealth the first batch of guys but you can stealthily take out the second batch of guys down by the staging area. You can choose to either go in guns-a-blazin’ or to take the guys out quietly, one by one.
Proceed to take the yellow crate and push it toward the entrance where you can use it to climb up and grapple to the next segment.
After going through the climbing segment and scaling the mountain toward the monastery, you’ll find another group of mercenaries in the next area. You can either stealth it or Rambo your way inside.
You can check out an alternate playlist featuring a walkthrough of Uncharted 4: A Thief’s End courtesy of YouTuber MKIceandFire. It’s also commentary free, so you just get nothing but the game.
During the section where Nate and Sam are making their way to the monastery through the rough cliff-sliding area, you’ll need to slide-and-hop around the pillars until you get to the front entrance of the monastery.
When you get to the graveyard you’ll find the necessary grave at the end of the yard with the two swords. It’s close to the edge of the yard.
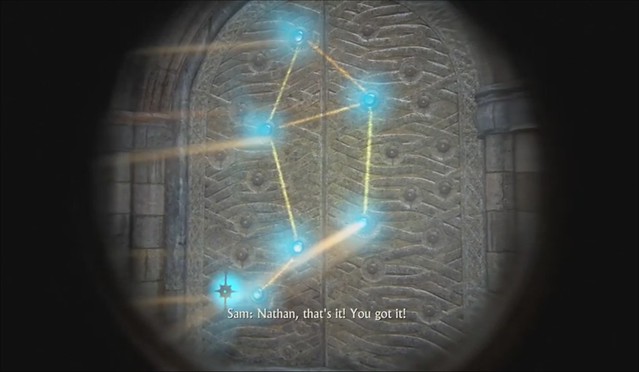
After venturing into the secret mausoleum, you’ll encounter a light puzzle. You’ll need to connect the dots through the lights by aligning the lights in pairs. You can see the image below for an idea of how it should look.
After going through more platforming segments and battling a few of the Shoreline mercenaries, Nate and Sam end up in a cave with yet another puzzle involving several crosses and a bucket of water.
You’ll need to align the three crosses so that the bucket is at the very top, the black cross is on the right, the stubby cross is on the left and the thin cross on the top. It’s highlighted in the image below.

Once you complete the light and bucket puzzle, you’ll need to progress through some more caves and platforming.
You’ll eventually move through some catacombs before encountering a cinematic invovling Rafe and Nadine.
In the next climbing segment you’ll need to get a crate in order to climb up the ledge. You’ll need to grapple to the ledge, rappel down, swing to the other platform in between the ledge and climb up. You’ll find a crate that can be pushed over and used to climb up the ledge.
From there it’ll be another gunfight following some more platforming, eventually leading to the explosive end of the level.
When the trio eventually gets to Madagascar, just follow the pathways and tire tracks to get to the appropriate location. You’ll need to drive up a bunch of steep rocks and muddy hills.

After taking out the outpost, it’s possible to attach the winch to the broken bridge to pull it down and proceed to the next area.
After some more shooting segments Nate and Sully end up in a town that leads to a tower where a clock puzzle must be completed in order to proceed to the next area.
While in the tower you have to climb to the top in a fairly linear platforming segment and ring the bells in a specific order. You have to do Scorpio first, Aquarius, Leo and Taurus.

After completing the platforming segment, you’ll need to complete a pirate puzzle mechanism in a room full of paintings. First you’ll need to identify the hints on the paintings and then align the symbols.
You’ll need to organize each image and puzzle piece to match up so that you can progress through the mechanism. There are images below to show you how to align each series of symbols for the Founders puzzle.
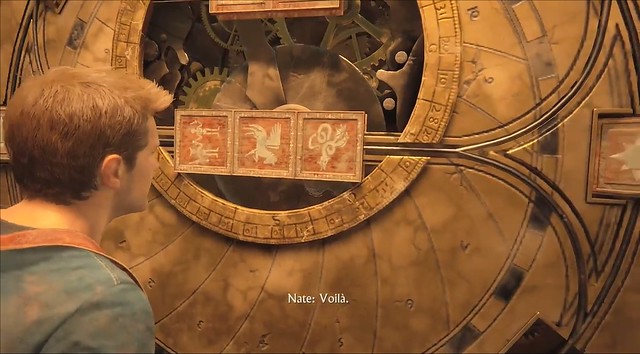
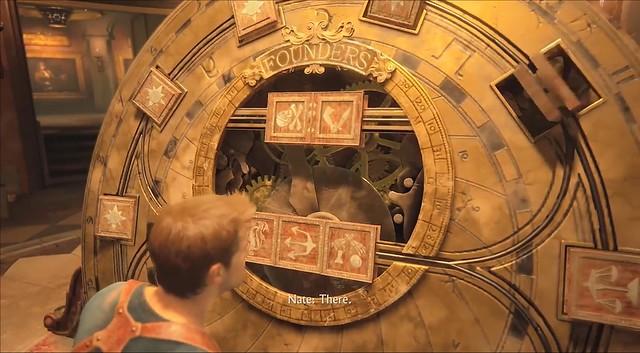
For the final permutation featuring the Founder symbols of Edward England, Yazid al-Basra, and Tariq bin Malik, it gets a bit tricky trying to find and match up their sigils with the puzzle symbols, but there is an image below that will show you what you need to get it done and matched up in the right way. Just align each of the symbols with the orientation of the pieces in the image below.
I imagine plenty of players will get stuck on this particular Uncharted 4 puzzle given its difficulty, but it’s not impossible to complete.

Now if you have trouble with any of the puzzles in the game, there’s actually a video compilation for each and every single puzzle in the game that shows you how to complete them. You can check that out below courtesy of Gamer’s Little Playground.
Of course, if you just want to see all of the cutscenes with none of the gameplay fluff, from start to finish, you can check out the movie compilation that was put together as well. You can check that out below, featuring six full hours of cutscenes. You’ll most certainly be there for a while going over all of that material.
Uncharted 4 is available right now exclusively for the PlayStation 4. It’s a lot bigger, badder and meaner than the other games and is chock full of content and a lot of replayability, even more-so than the third game.